 |
Reference documentation for deal.II version 9.2.0
|
 |
Reference documentation for deal.II version 9.2.0
|
This tutorial depends on step-53.
| Table of contents | |
|---|---|
This program was contributed by Andrea Mola and Luca Heltai.
In some of the previous tutorial programs (step-1, step-3, step-5, step-6 and step-49 among others) we have learned how to use the mesh refinement methods provided in deal.II. These tutorials have shown how to employ such tools to produce a fine grid for a single simulation, as done in step-3; or to start from a coarse grid and carry out a series of simulations on adaptively refined grids, as is the case of step-6. Regardless of which approach is taken, the mesh refinement requires a suitable geometrical description of the computational domain boundary in order to place, at each refinement, the new mesh nodes onto the boundary surface. For instance, step-5 shows how creating a circular grid automatically attaches a circular manifold object to the computational domain, so that the faces lying on the boundary are refined onto the circle. step-53 shows how to do this with a Manifold defined by experimentally obtained data. But, at least as far as elementary boundary shapes are concerned, deal.II really only provides circles, spheres, boxes and other elementary combinations. In this tutorial, we will show how to use a set of classes developed to import arbitrary CAD geometries, assign them to the desired boundary of the computational domain, and refine a computational grid on such complex shapes.
In the most common industrial practice, the geometrical models of arbitrarily shaped objects are realized by means of Computer Aided Design (CAD) tools. The use of CAD modelers has spread in the last decades, as they allow for the generation of a full virtual model of each designed object, which through a computer can be visualized, inspected, and analyzed in its finest details well before it is physically crafted. From a mathematical perspective, the engine lying under the hood of CAD modelers is represented by analytical geometry, and in particular by parametric curves and surfaces such as B-splines and NURBS that are rich enough that they can represent most surfaces of practical interest. Once a virtual model is ready, all the geometrical features of the desired object are stored in files which materially contain the coefficients of the parametric surfaces and curves composing the object. Depending on the specific CAD tool used to define the geometrical model, there are of course several different file formats in which the information of a CAD model can be organized. To provide a common ground to exchange data across CAD tools, the U.S. National Bureau of Standards published in 1980 the Initial Graphics Exchange Representation (IGES) neutral file format, which is used in this example.
To import and interrogate CAD models, the deal.II library implements a series of wrapper functions for the OpenCASCADE open source library for CAD modeling. These functions allow to import IGES files into OpenCASCADE native objects, and wrap them inside a series of Manifold classes.
Once imported from an IGES file, the model is stored in a TopoDS_Shape, which is the generic topological entity defined in the OpenCASCADE framework. From a TopoDS_Shape, it is then possible to access all the sub-shapes (such as vertices, edges and faces) composing it, along with their geometrical description. In the deal.II framework, the topological entities composing a shape are used to create a corresponding Manifold representation. In step-6 we saw how to use GridGenerator::hyper_sphere() to create a hyper sphere, which automatically attaches a SphericalManifold to all boundary faces. This guarantees that boundary faces stay on a sphere or circle during mesh refinement. The functions of the CAD modeling interface have been designed to retain the same structure, allowing the user to build a projector object using the imported CAD shapes, maintaining the same procedure we used in other tutorial programs, i.e., assigning such projector object to cells, faces or edges of a coarse mesh. At each refinement cycle, the new mesh nodes will be then automatically generated by projecting a midpoint of an existing object onto the specified geometry.
Differently from a spherical or circular boundary, a boundary with a complex geometry poses problems as to where it is best to place the new nodes created upon refinement on the prescribed shape. PolarManifold, for example, transforms the surrounding points to polar coordinates, calculates the average in that coordinate system (for each coordinate individually) and finally transforms the point back to Cartesian coordinates.
In the case of an arbitrary and complex shape though, an appropriate choice for the placement of a new node cannot be identified that easily. The OpenCASCADE wrappers in deal.II provide several projector classes that employ different projection strategies. A first projector, implemented in the OpenCASCADE::ArclengthProjectionLineManifold class, is to be used only for edge refinement. It is built assigning it a topological shape of dimension one, either a TopoDS_Edge or a TopoDS_Wire (which is a compound shape, made of several connected TopoDS_Edges) and refines a mesh edge finding the new vertex as the point splitting in two even parts the curvilinear length of the CAD curve portion that lies between the vertices of the original edge.

A different projection strategy has been implemented in the OpenCASCADE::NormalProjectionBoundary class. The TopoDS_Shape assigned at construction time can be arbitrary (a collection of shapes, faces, edges or a single face or edge will all work). The new cell nodes are first computed by averaging the surrounding points in the same way as FlatManifold does. In a second step, all the new nodes will be projected onto the TopoDS_Shape along the direction normal to the shape. If no normal projection is available, the point which is closest to the shape—typically lying on the shape boundary—is selected. If the shape is composed of several sub-shapes, the projection is carried out onto every single sub-shape, and the closest projection point is selected.
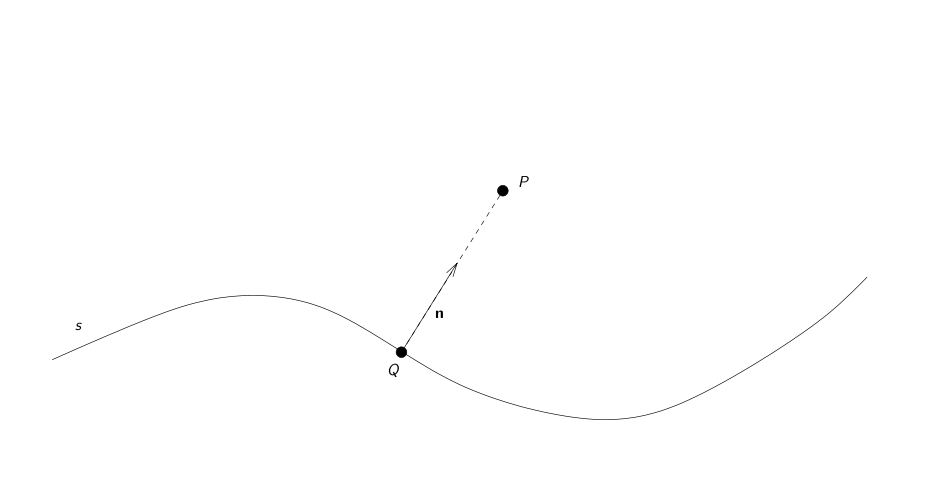
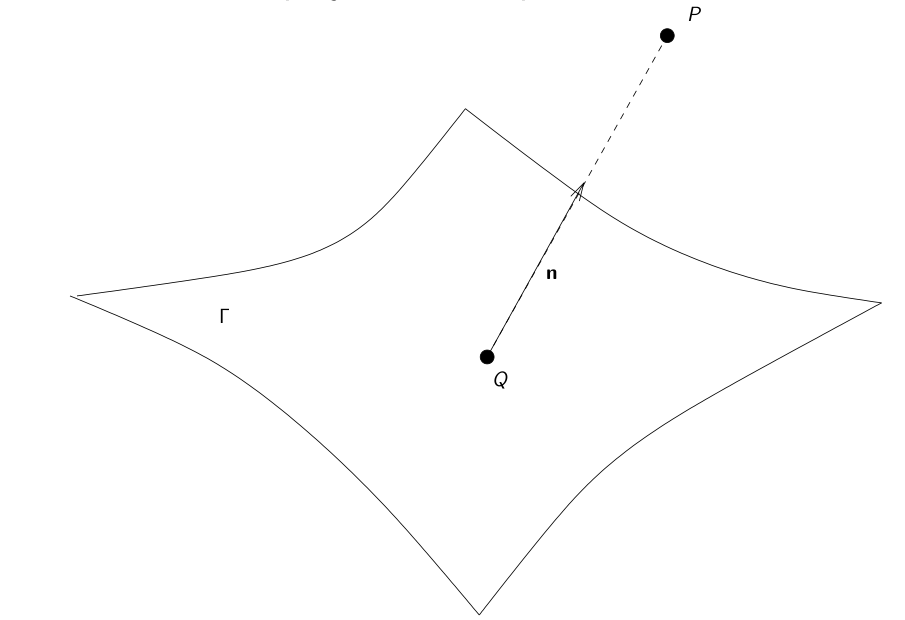
As we are about to experience, for some shapes, setting the projection direction as that normal to the CAD surface will not lead to surface mesh elements of suitable quality. This is because the direction normal to the CAD surface has in principle nothing to do with the direction along which the mesh needs the new nodes to be located. The OpenCASCADE::DirectionalProjectionBoundary class, in this case, can help. This class is constructed assigning a TopoDS_Shape (containing at least a face) and a direction along which all the projections will be carried out. New points will be computed by first averaging the surrounding points (as in the FlatManifold case), and then taking the closest intersection between the topological shape and the line passing through the resulting point, along the direction used at construction time. In this way, the user will have a higher control on the projection direction to be enforced to ensure good mesh quality.
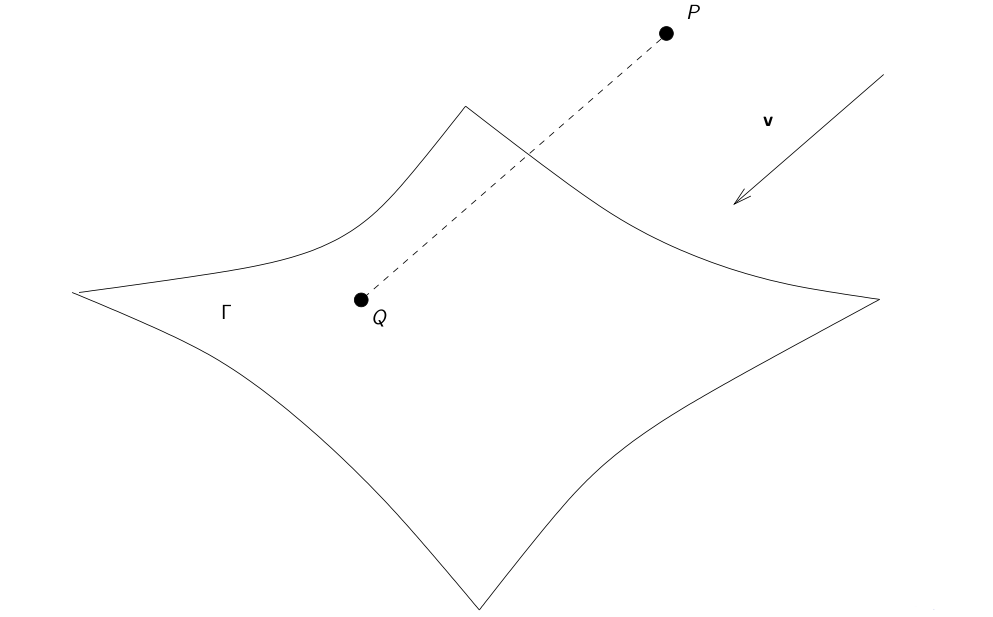
Of course the latter approach is effective only when the orientation of the surface is rather uniform, so that a single projection direction can be identified. In cases in which the surface direction is approaching the projection direction, it is even possible that the directional projection is not found. To overcome these problems, the OpenCASCADE::NormalToMeshProjectionBoundary class implements a third projection algorithm. The OpenCASCADE::NormalToMeshProjectionBoundary class is built assigning a TopoDS_Shape (containing at least one face) to the constructor, and works exactly like a OpenCASCADE::DirectionalProjection. But, as the name of the class suggests, OpenCASCADE::NormalToMeshProjectionBoundary tries to come up with a suitable estimate of the direction normal to the mesh elements to be refined, and uses it for the projection of the new nodes onto the CAD surface. If we consider a mesh edge in a 2D space, the direction of its axis is a direction along which to split it in order to give rise to two new cells of the same length. We here extended this concept in 3D, and project all new nodes in a direction that approximates the cell normal.
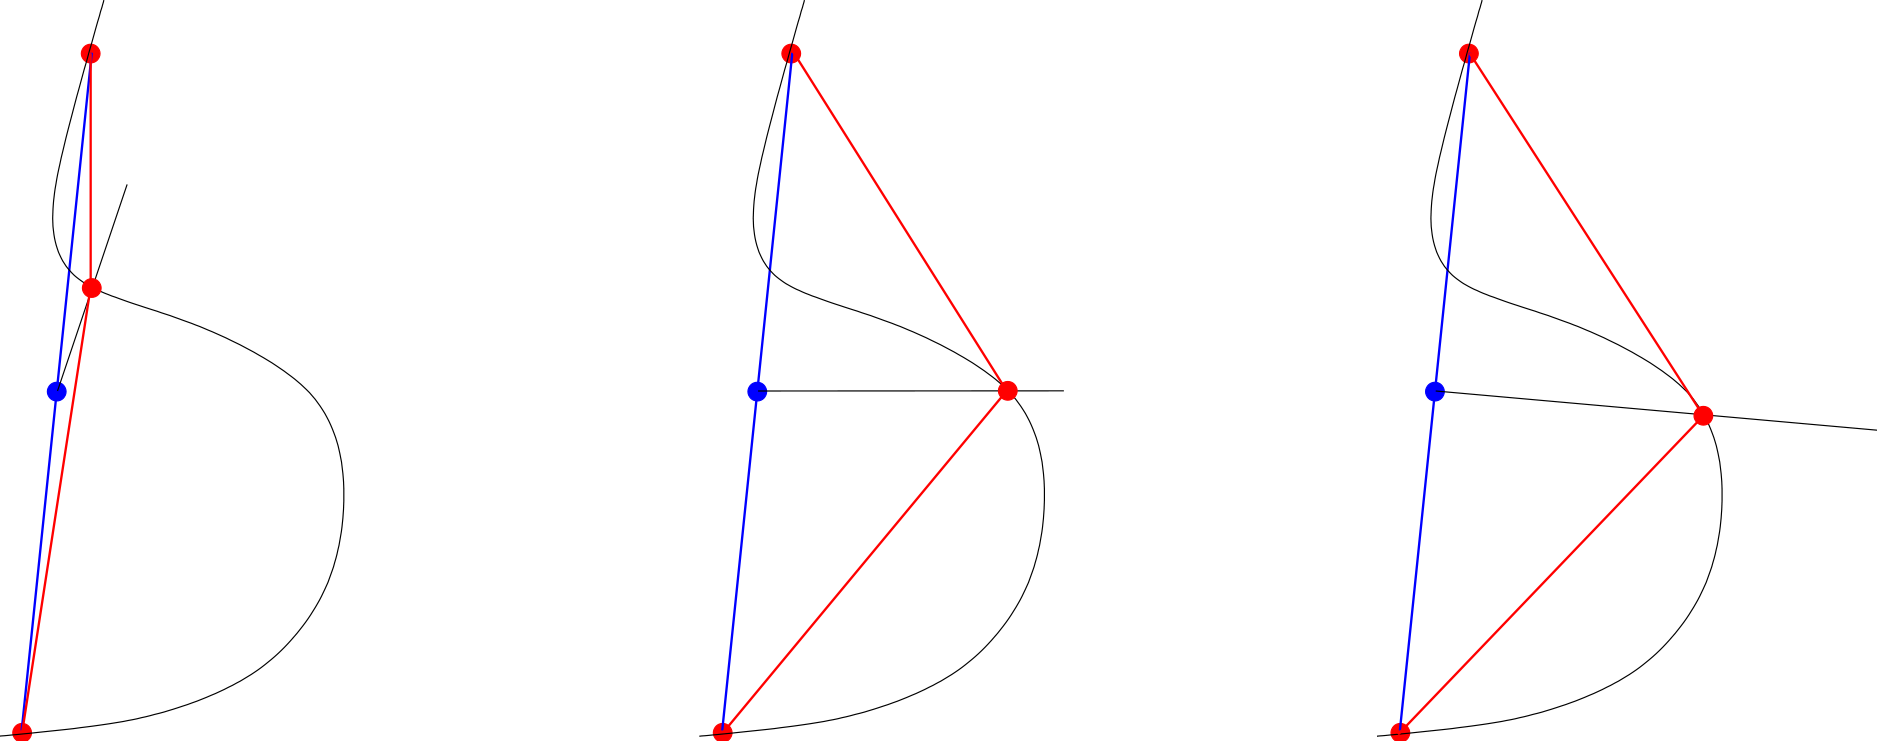
In the next figure, which is inspired by the geometry considered in this tutorial, we make an attempt to compare the behavior of the three projectors considered. As can be seen on the left, given the original cell (in blue), the new point found with the normal projection is in a position which does not allow for the generation of evenly spaced new elements (in red). The situation will get worse in further refinement steps. Since the geometry we considered is somehow perpendicular to the horizontal direction, the directional projection (central image) defined with horizontal direction as the projection direction, does a rather good job in getting the new mesh point. Yet, since the surface is almost horizontal at the bottom of the picture, we can expect problems in those regions when further refinement steps are carried out. Finally, the picture on the right shows that a node located on the cell axis will result in two new cells having the same length. Of course the situation in 3D gets a little more complicated than that described in this simple 2D case. Nevertheless, the results of this test confirm that the normal to the mesh direction is the best approach among the three tested, when arbitrarily shaped surfaces are considered, and unless you have a geometry for which a more specific approach is known to be appropriate.
In this program, we will consider creating a surface mesh for a real geometry describing the bow of a ship (this geometry is frequently used in CAD and mesh generation comparisons and is freely available). The surface mesh we get from this could then be used to solve a boundary element equation to simulate the flow of water around the ship (in a way similar to step-34) but we will not try to do this here. To already give you an idea of the geometry we consider, here is a picture:
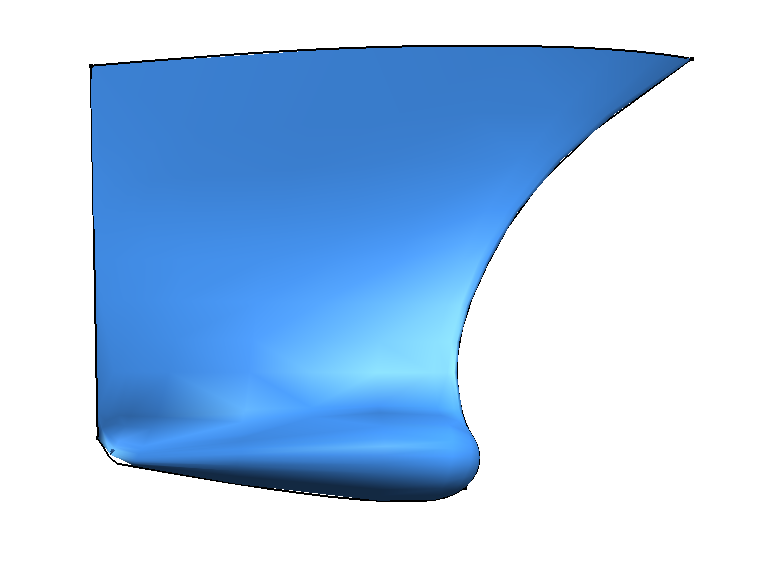
In the program, we read both the geometry and a coarse mesh from files, and then employ several of the options discussed above to place new vertices for a sequence of mesh refinement steps.
We start with including a bunch of files that we will use in the various parts of the program. Most of them have been discussed in previous tutorials already:
These are the headers of the opencascade support classes and functions. Notice that these will contain sensible data only if you compiled your deal.II library with support for OpenCASCADE, i.e., specifying -DDEAL_II_WITH_OPENCASCADE=ON and -DOPENCASCADE_DIR=/path/to/your/opencascade/installation when calling cmake during deal.II configuration.
Finally, a few C++ standard header files
We isolate the rest of the program in its own namespace
This is the main class. All it really does is store names for input and output files, and a triangulation. It then provides a function that generates such a triangulation from a coarse mesh, using one of the strategies discussed in the introduction and listed in the enumeration type at the top of the class.
The member functions of this class are similar to what you can find in most of the other tutorial programs in the setup stage of the grid for the simulations.
The constructor of the TriangulationOnCAD class is very simple. The input arguments are strings for the input and output file names, and the enumeration type that determines which kind of surface projector is used in the mesh refinement cycles (see below for details).
The following function represents the core of this program. In this function we import the CAD shape upon which we want to generate and refine our triangulation. We assume that the CAD surface is contained in the cad_file_name file (we provide an example IGES file in the input directory called "input/DTMB-5415_bulbous_bow.iges" that represents the bulbous bow of a ship). The presence of several convex and concave high curvature regions makes the geometry we provided a particularly meaningful example.
After importing the hull bow surface, we extract some of the curves and surfaces composing it, and use them to generate a set of projectors. Such projectors define the rules the Triangulation has to follow to position each new node during cell refinement.
To initialize the Triangulation, as done in previous tutorial programs, we import a pre-existing grid saved in VTK format. We assume here that the user has generated a coarse mesh externally, which matches the IGES geometry. At the moment of writing this tutorial, the deal.II library does not automatically support generation of such meshes, but there are several tools which can provide you with reasonable initial meshes starting from CAD files. In our example, the imported mesh is composed of a single quadrilateral cell whose vertices have been placed on the CAD shape.
After importing both the IGES geometry and the initial mesh, we assign the projectors previously discussed to each of the edges and cells which will have to be refined on the CAD surface.
In this tutorial, we will test the three different CAD surface projectors described in the introduction, and will analyze the results obtained with each of them. As mentioned, each of these projection strategies has been implemented in a different class, and objects of these types can be assigned to a triangulation using the Triangulation::set_manifold method.
The following function then first imports the given CAD file. The function arguments are a string containing the desired file name, and a scale factor. In this example, the scale factor is set to 1e-3, as the original geometry is written in millimeters (which is the typical unit of measure for most IGES files), while we prefer to work in meters. The output of the function is an object of OpenCASCADE generic topological shape class, namely a TopoDS_Shape.
Each CAD geometrical object is defined along with a tolerance, which indicates possible inaccuracy of its placement. For instance, the tolerance tol of a vertex indicates that it can be located in any point contained in a sphere centered in the nominal position and having radius tol. While projecting a point onto a surface (which will in turn have its tolerance) we must keep in mind that the precision of the projection will be limited by the tolerance with which the surface is built.
The following method extracts the tolerance of the given shape and makes it a bit bigger to stay our of trouble:
We now want to extract a set of composite sub-shapes from the generic shape. In particular, each face of the CAD file is composed of a trimming curve of type TopoDS_Wire, which is the collection of TopoDS_Edges that compose the boundary of a surface, and a NURBS description of the surface itself. We will use a line projector to associate the boundary of our Triangulation to the wire delimiting the surface. To extract all compound sub-shapes, like wires, shells, or solids, we resort to a method of the OpenCASCADE namespace. The input of OpenCASCADE::extract_compound_shapes is a shape and a set of empty std::vectors of subshapes, which will be filled with all compound shapes found in the given topological shape:
The next few steps are more familiar, and allow us to import an existing mesh from an external VTK file, and convert it to a deal triangulation.
We output this initial mesh saving it as the refinement step 0.
The mesh imported has a single, two-dimensional cell located in three-dimensional space. We now want to ensure that it is refined according to the CAD geometry imported above. This this end, we get an iterator to that cell and assign to it the manifold_id 1 (see this glossary entry). We also get an iterator to its four faces, and assign each of them the manifold_id 2:
Once both the CAD geometry and the initial mesh have been imported and digested, we use the CAD surfaces and curves to define the projectors and assign them to the manifold ids just specified.
A first projector is defined using the single wire contained in our CAD file. The ArclengthProjectionLineManifold will make sure that every mesh edge located on the wire is refined with a point that lies on the wire and splits it into two equal arcs lying between the edge vertices. We first check that the wires vector contains at least one element and then create a Manifold object for it.
Once the projector is created, we then assign it to all the parts of the triangulation with manifold_id = 2:
The surface projector is created according to what is specified with the surface_projection_kind option of the constructor. In particular, if the surface_projection_kind value equals NormalProjection, we select the OpenCASCADE::NormalProjectionManifold. The new mesh points will then initially be generated at the barycenter of the cell/edge considered, and then projected on the CAD surface along its normal direction. The NormalProjectionManifold constructor only needs a shape and a tolerance, and we then assign it to the triangulation for use with all parts that manifold having id 1:
If surface_projection_kind value is DirectionalProjection, we select the OpenCASCADE::DirectionalProjectionManifold class. The new mesh points will then initially be generated at the barycenter of the cell/edge considered, and then projected on the CAD surface along a direction that is specified to the OpenCASCADE::DirectionalProjectionManifold constructor. In this case, the projection is done along the y-axis.
As a third option, if surface_projection_kind value is NormalToMeshProjection, we select the OpenCASCADE::NormalToMeshProjectionManifold. The new mesh points will again initially be generated at the barycenter of the cell/edge considered, and then projected on the CAD surface along a direction that is an estimate of the mesh normal direction. The OpenCASCADE::NormalToMeshProjectionManifold constructor only requires a shape (containing at least a face) and a tolerance.
Finally, we use good software cleanliness by ensuring that this really covers all possible options of the case statement. If we get any other value, we simply abort the program:
This function globally refines the mesh. In other tutorials, it would typically also distribute degrees of freedom, and resize matrices and vectors. These tasks are not carried out here, since we are not running any simulation on the Triangulation produced.
While the function looks innocent, this is where most of the work we are interested in for this tutorial program actually happens. In particular, when refining the quads and lines that define the surface of the ship's hull, the Triangulation class will ask the various objects we have assigned to handle individual manifold ids for where the new vertices should lie.
Outputting the results of our computations is a rather mechanical task. All the components of this function have been discussed before:
This is the main function. It should be self explanatory in its briefness:
This is the main function of this program. It is in its basic structure like all previous tutorial programs, but runs the main class through the three possibilities of new vertex placement:
The program execution produces a series of mesh files 3d_mesh_*.vtk that we can visualize with any of the usual visualization programs that can read the VTK file format.
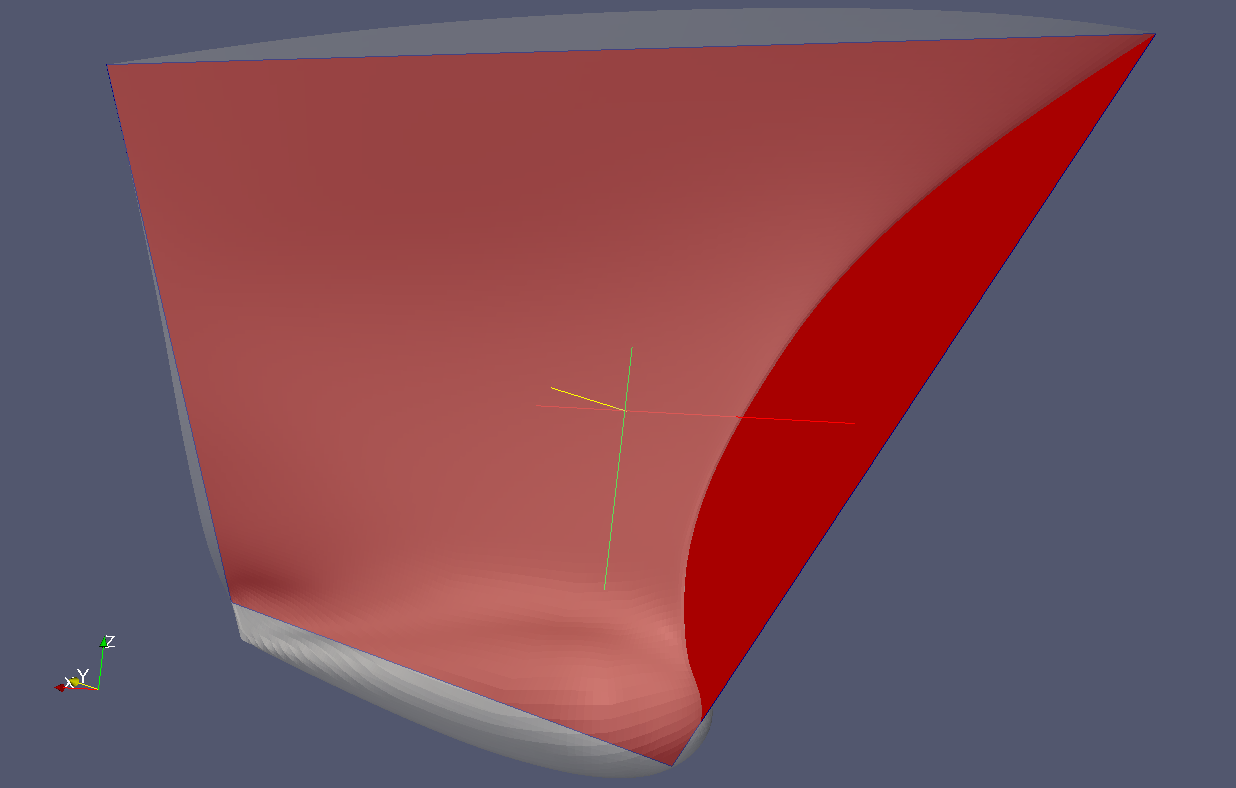
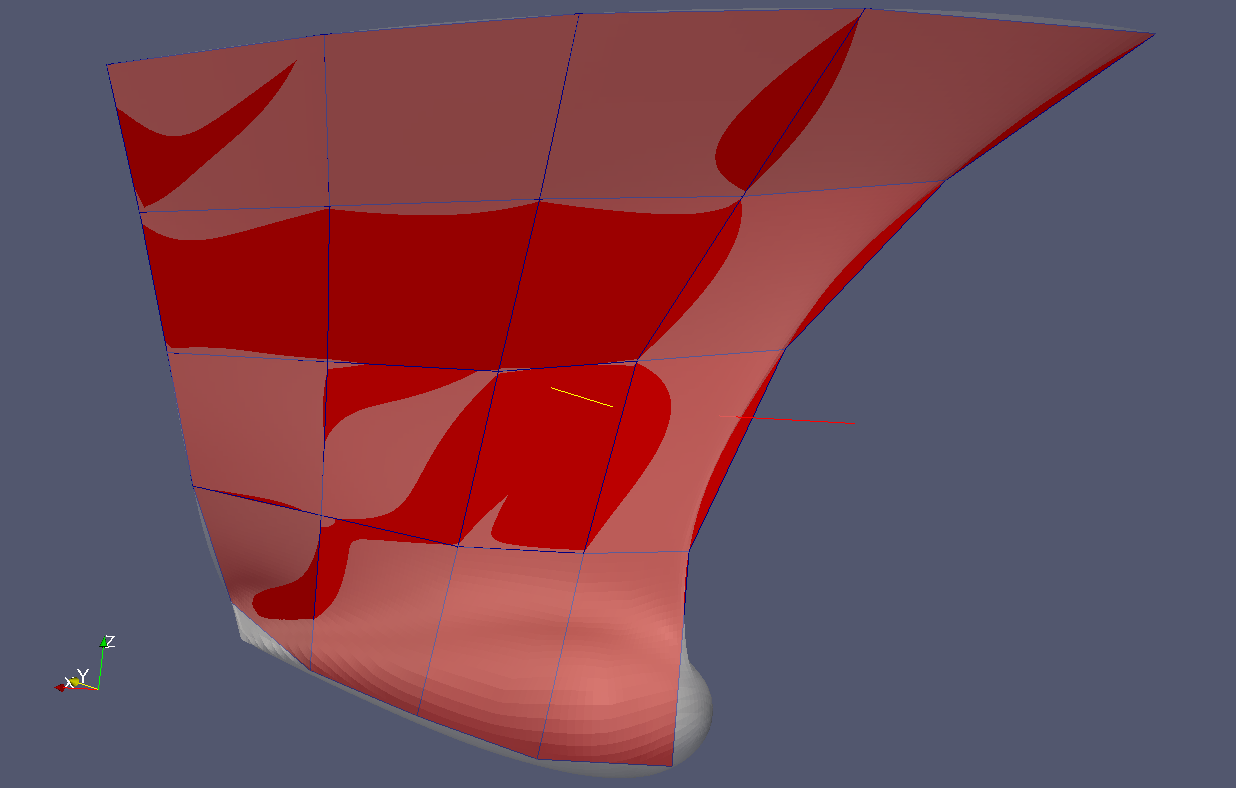
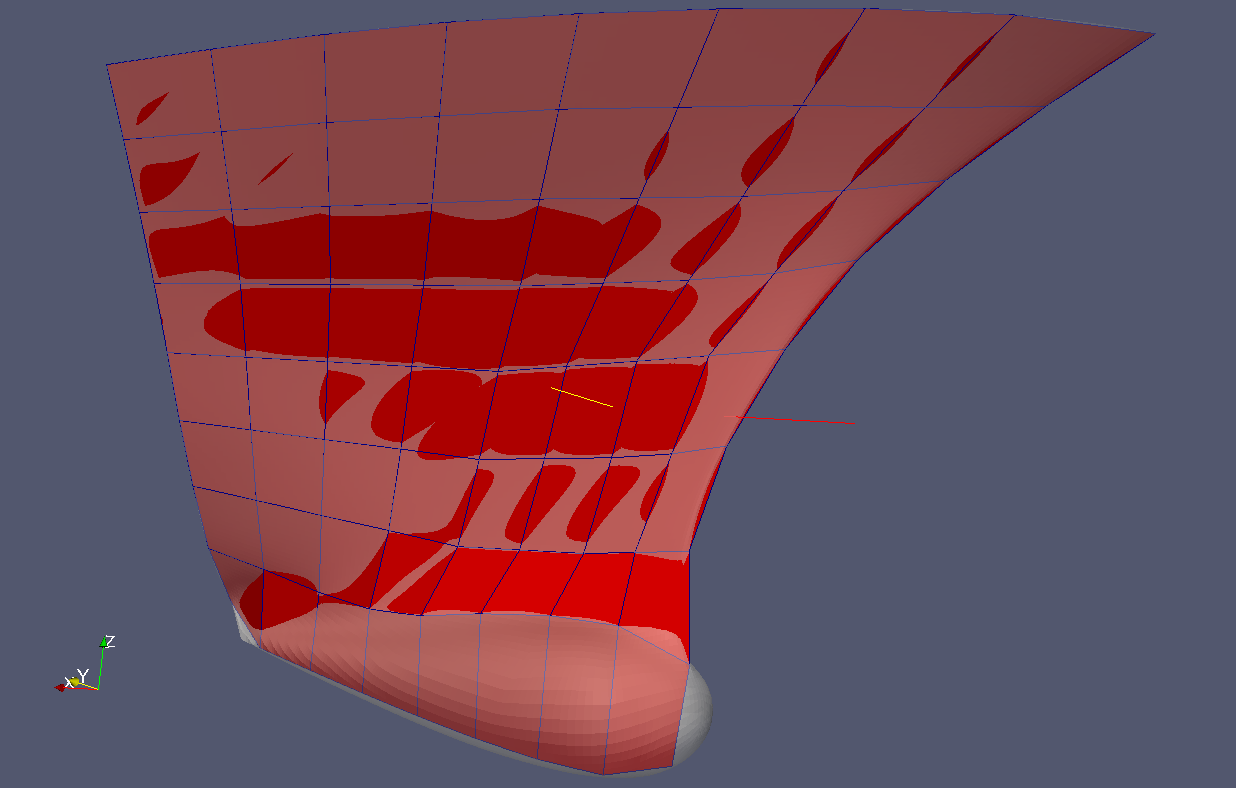
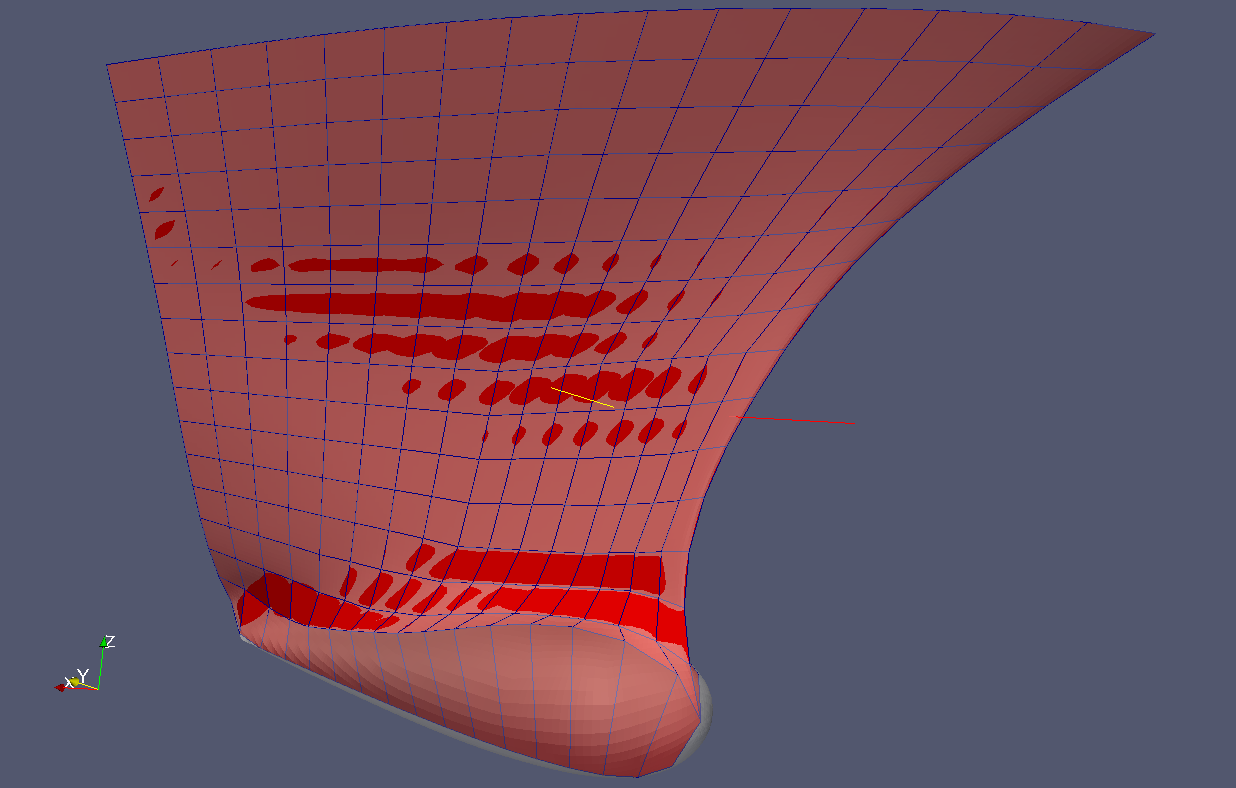
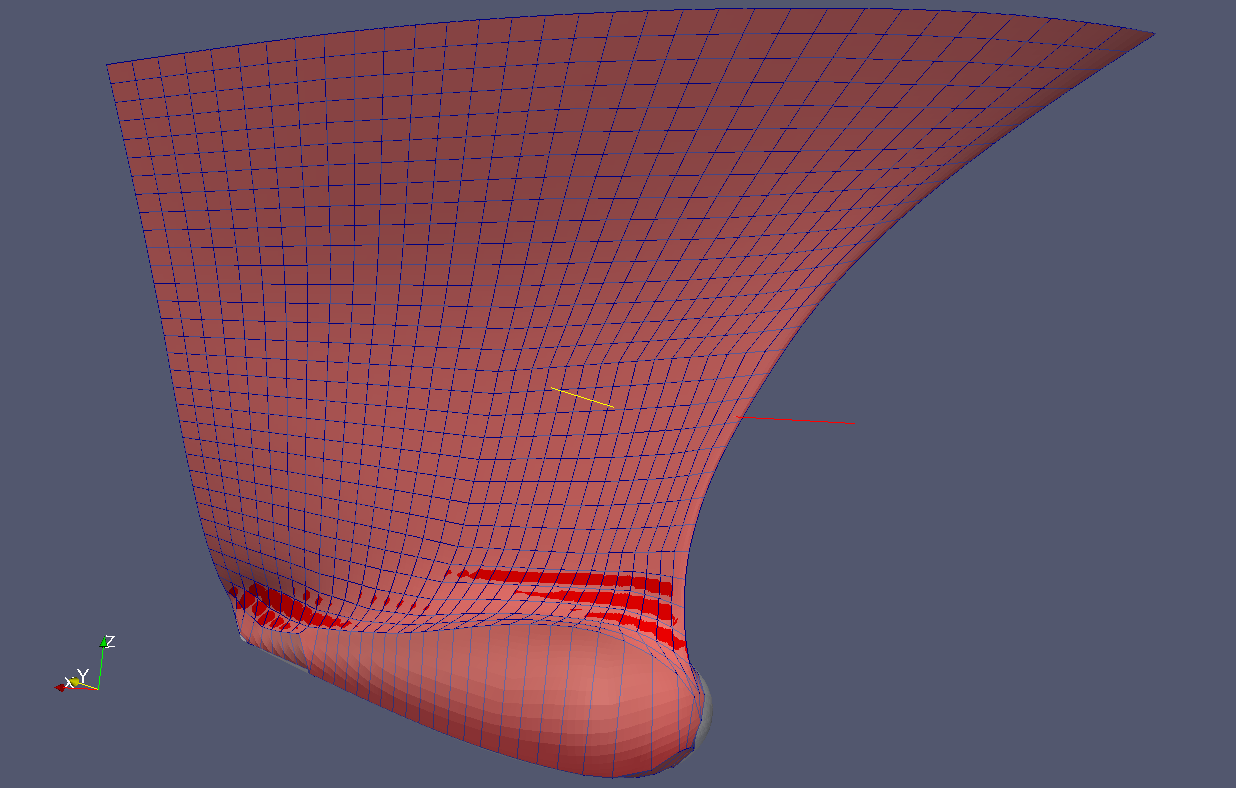
The following table illustrates the results obtained employing the normal projection strategy. The first two rows of the table show side views of the grids obtained for progressive levels of refinement, overlain on a very fine rendering of the exact geometry. The dark and light red areas simply indicate whether the current mesh or the fine geometry is closer to the observer; the distinction does not carry any particularly deep meaning. The last row of pictures depict front views (mirrored to both sides of the geometry) of the same grids shown in the second row.
 |  |  |
 |  |  |
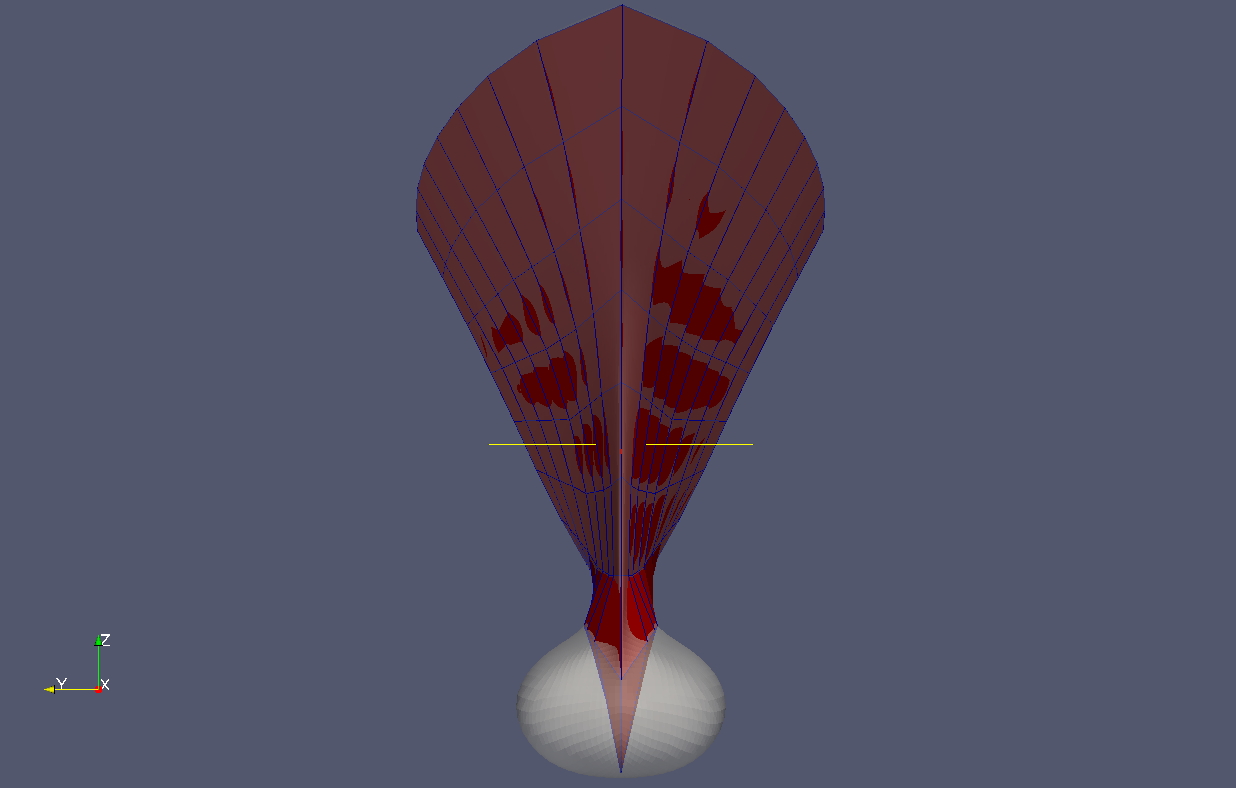 | 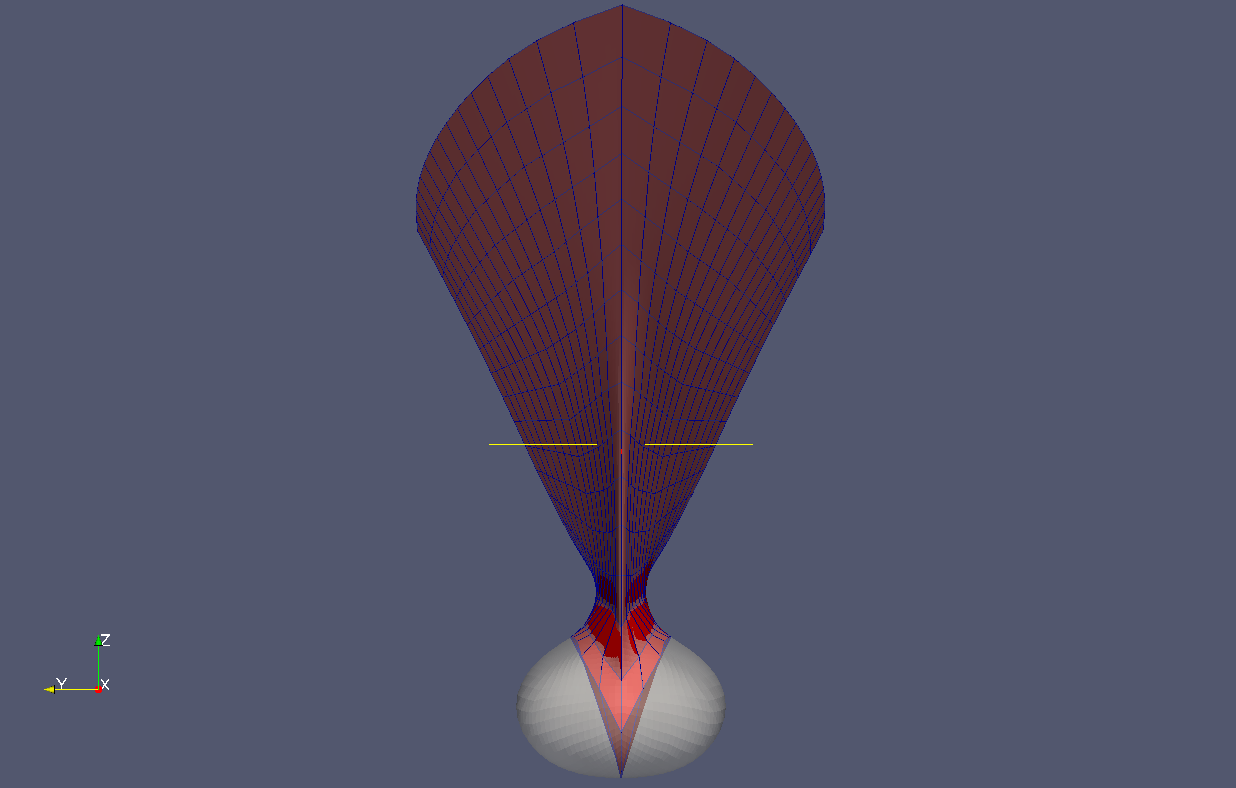 | 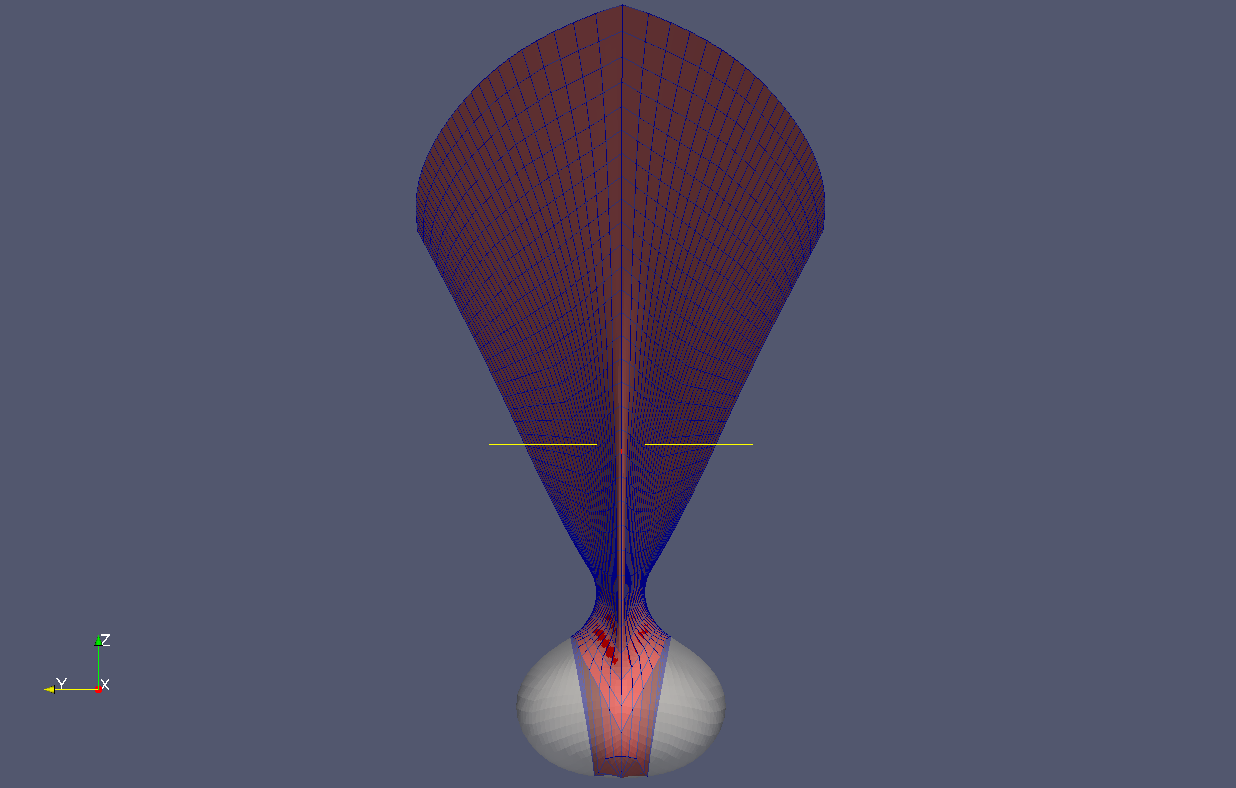 |
As can be seen in the pictures—and as we anticipated—the normal refinement strategy is unable to produce nicely shaped elements when applied to surfaces with significant curvature changes. This is particularly apparent at the bulb of the hull where all new points have been placed in the upper part of the bulb and the lower part remains completely unresolved.
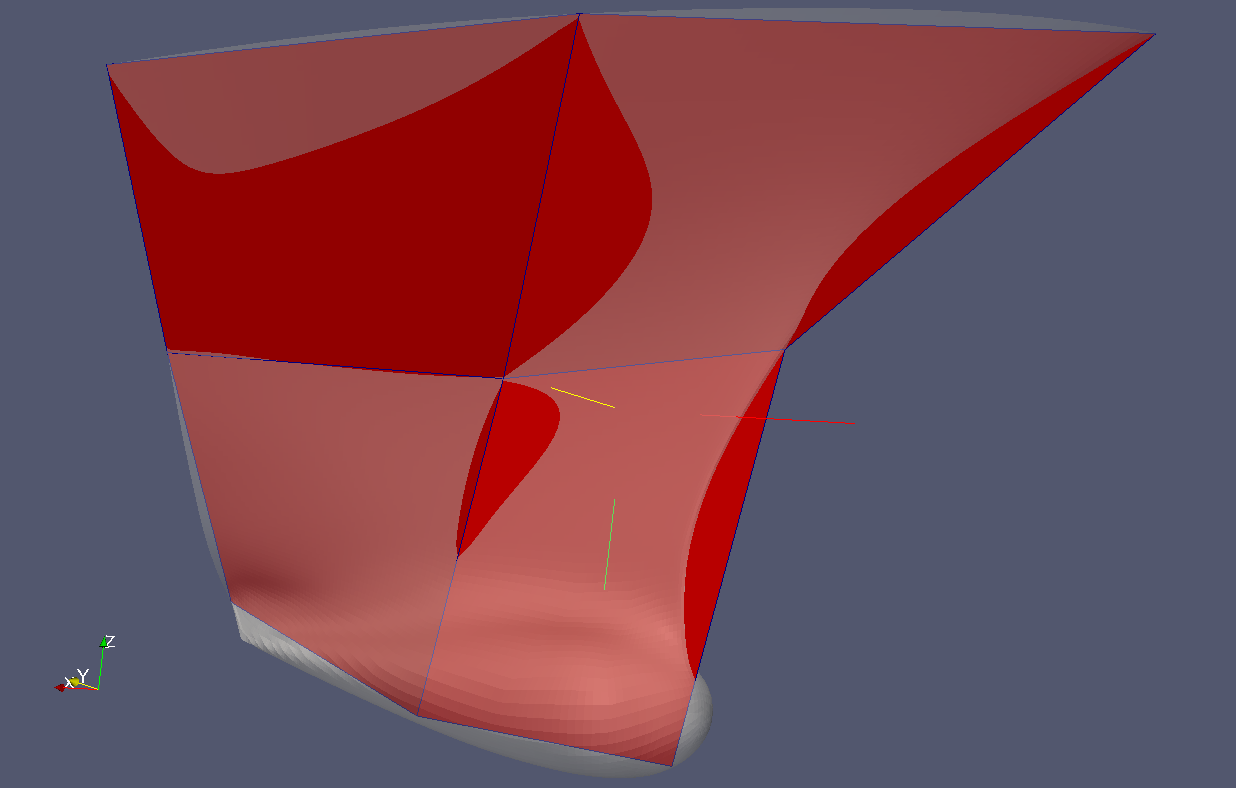
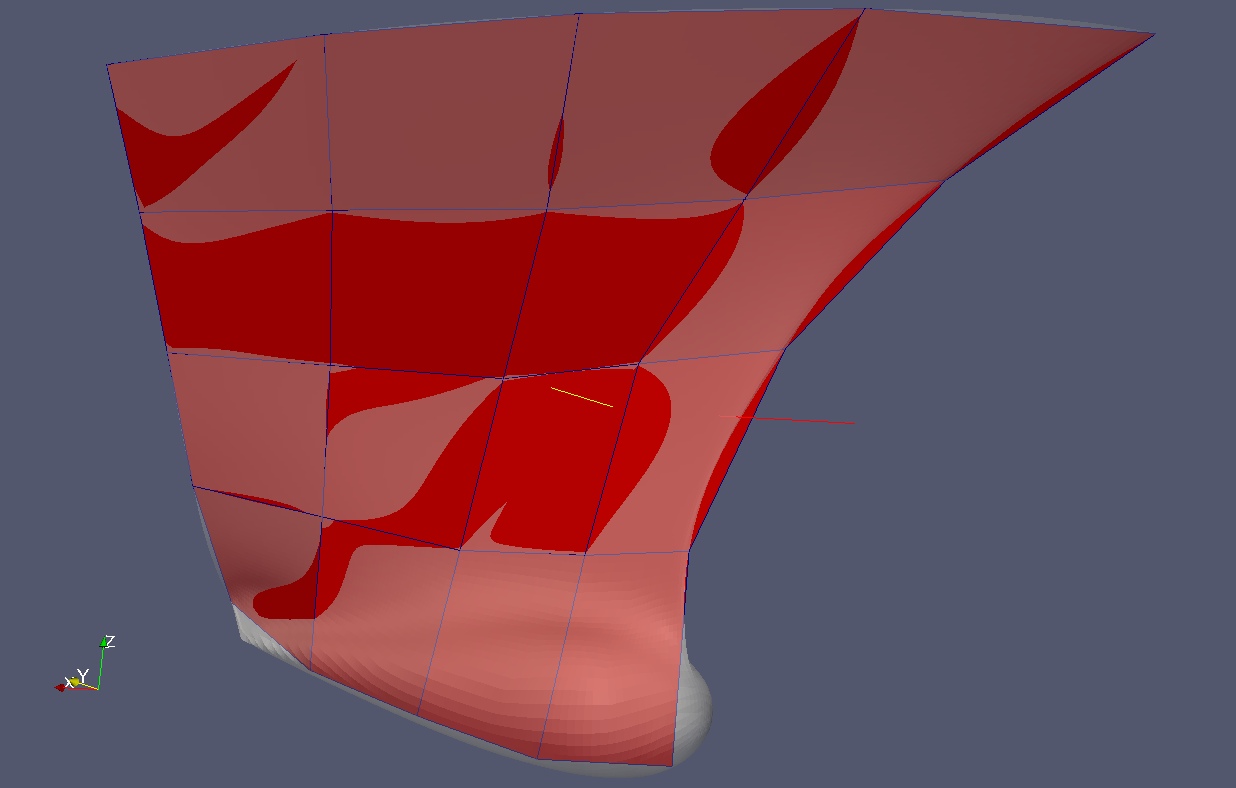
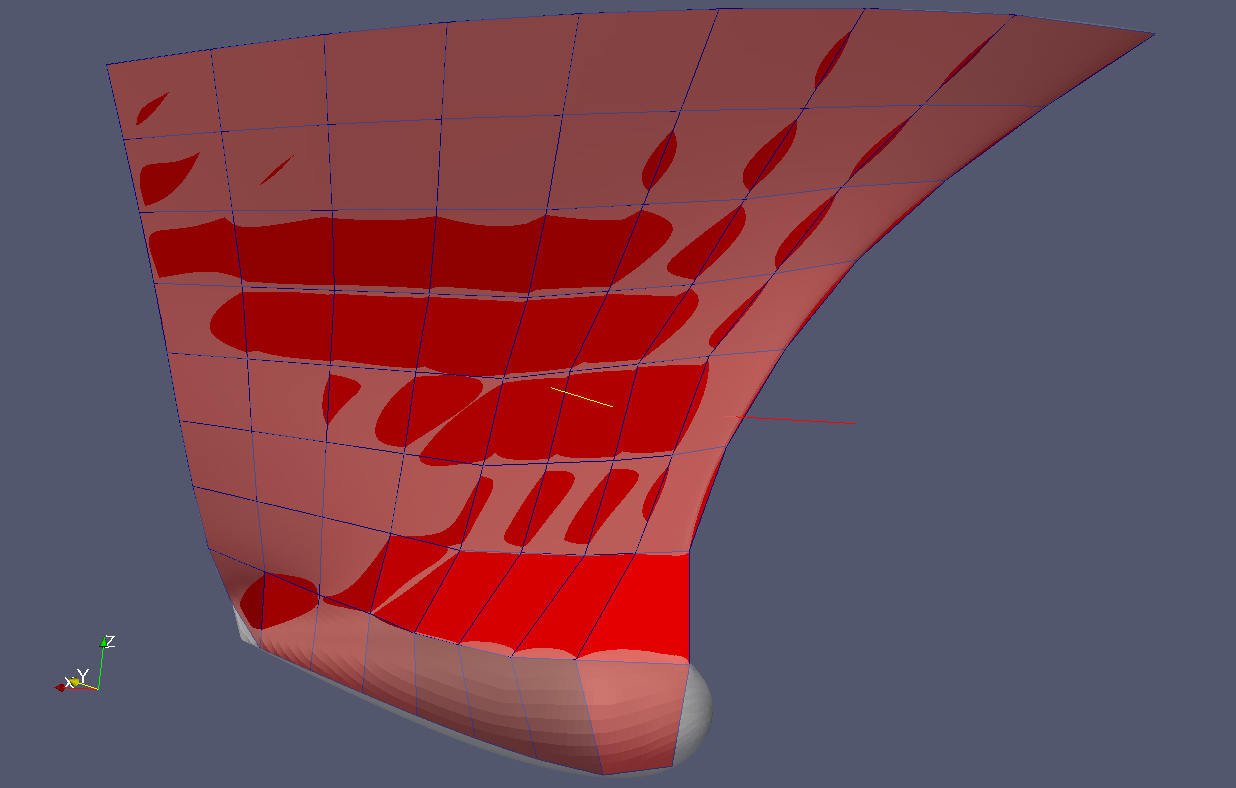
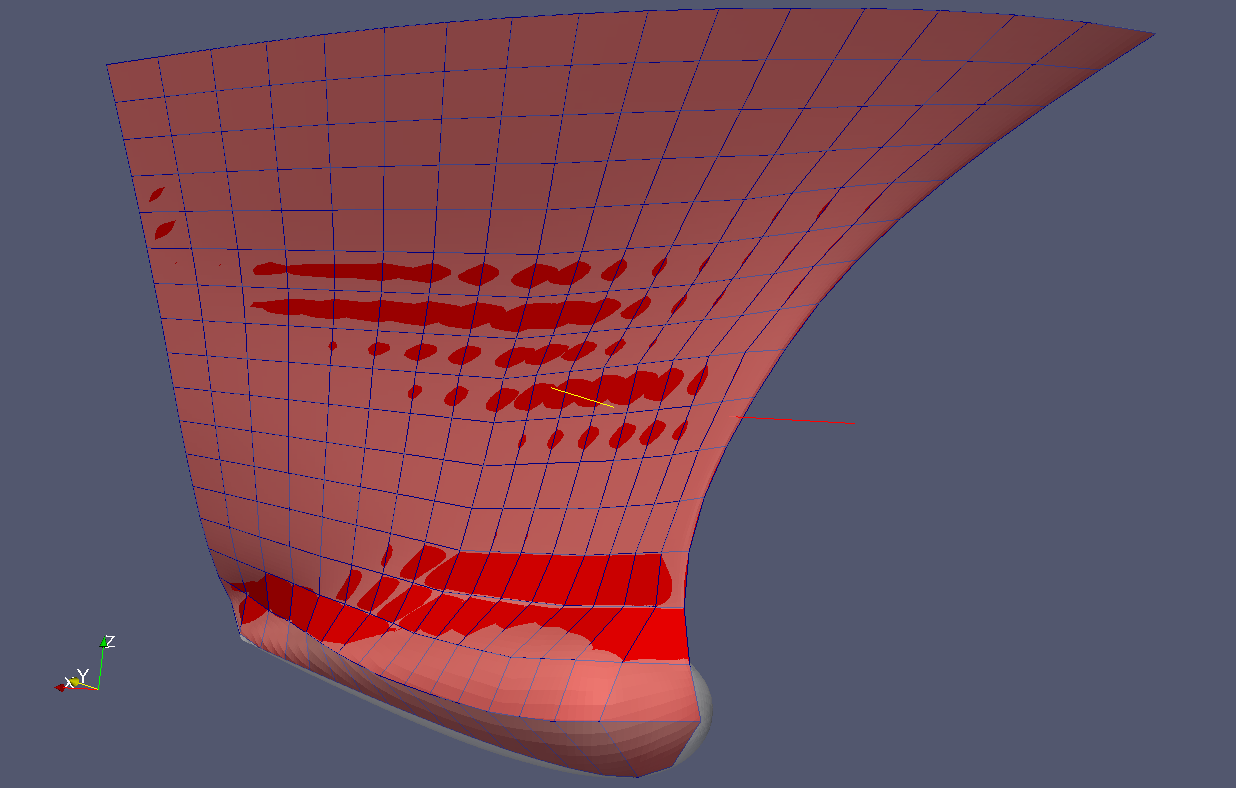
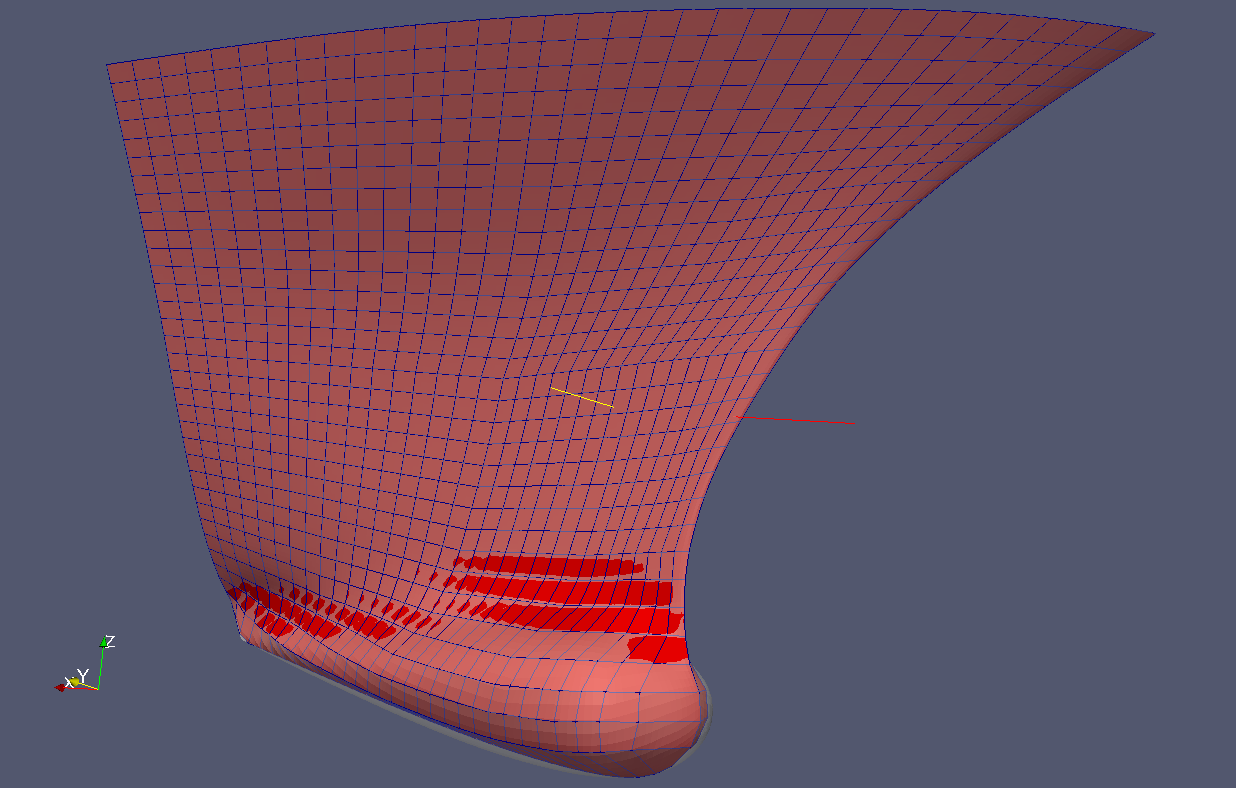
The following table, which is arranged as the previous one, illustrates the results obtained adopting the directional projection approach, in which the projection direction selected was the y-axis (which is indicated with a small yellow arrow at the bottom left of each image).
 |  |  |
 |  |  |
 | 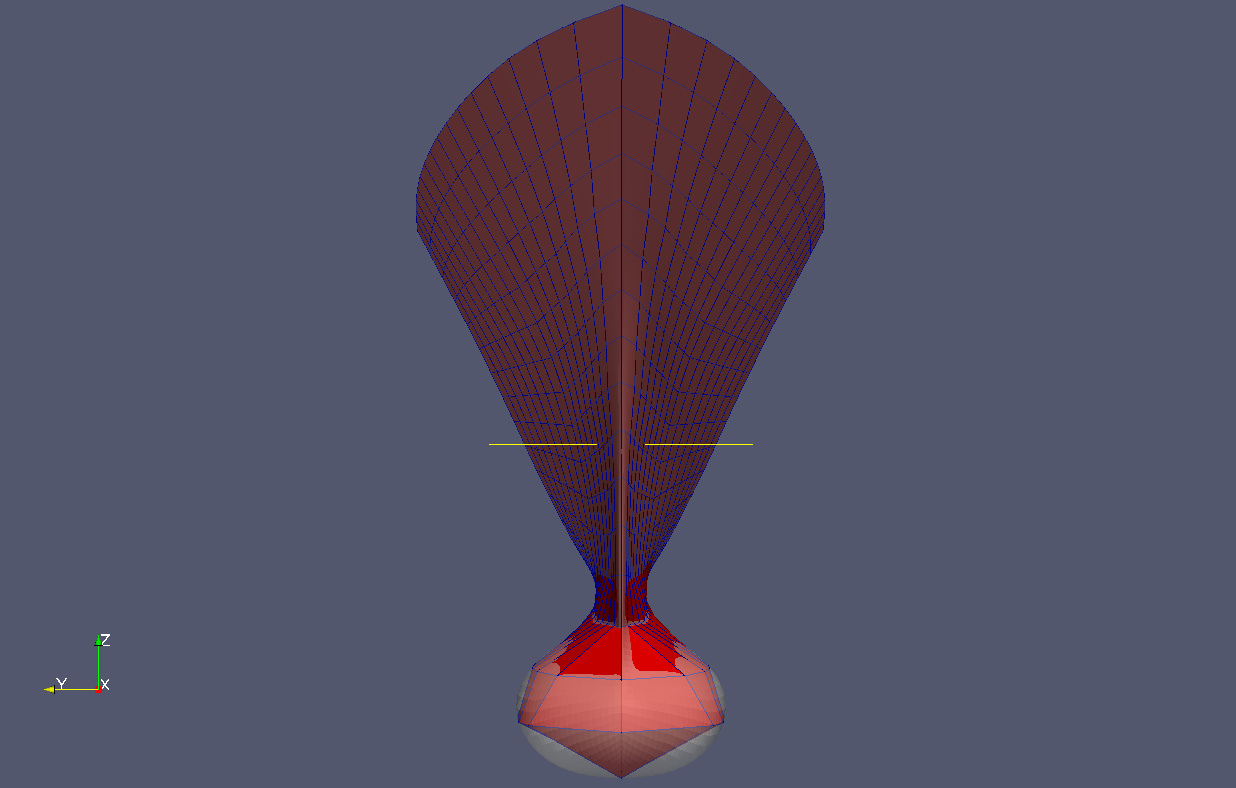 | 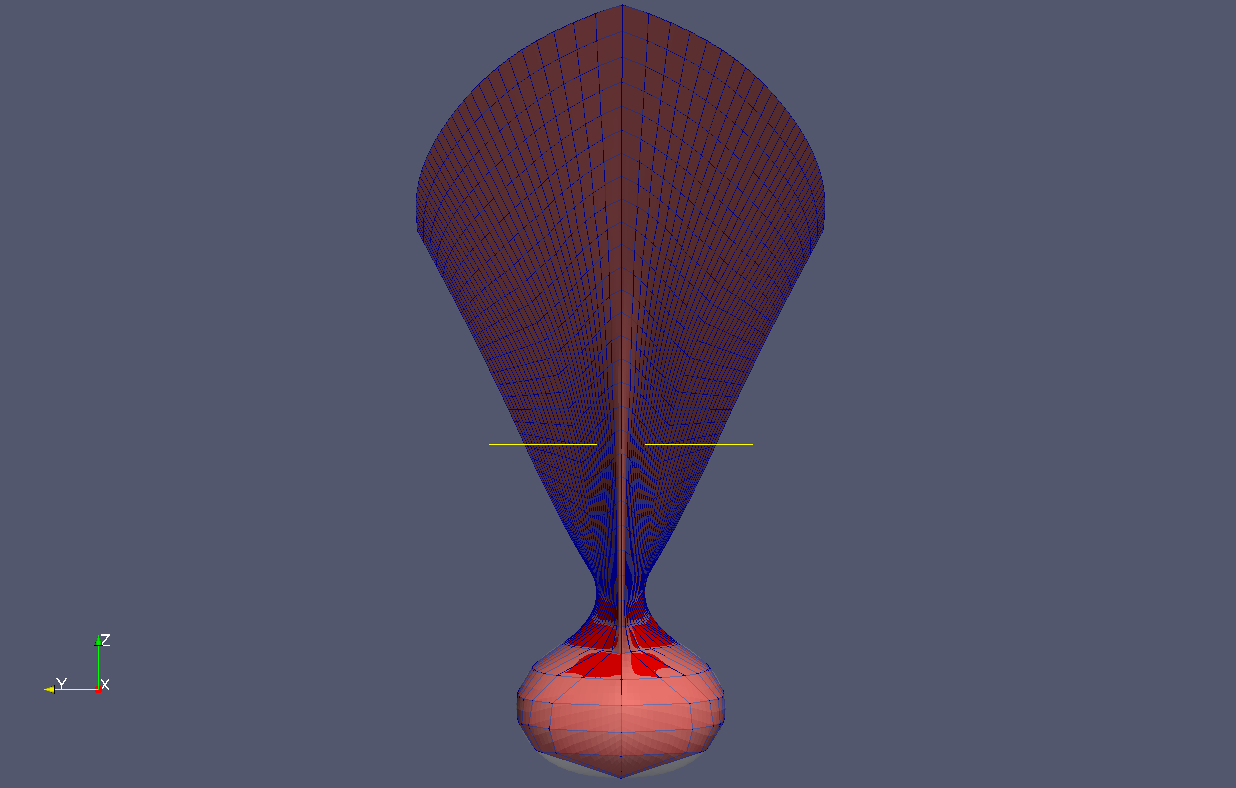 |
The images confirm that the quality of the mesh obtained with a directional projection is sensibly higher than that obtained projecting along the surface normal. Yet, a number of elements elongated in the y-direction are observed around the bottom of the bulb, where the surface is almost parallel to the direction chosen for the projection.
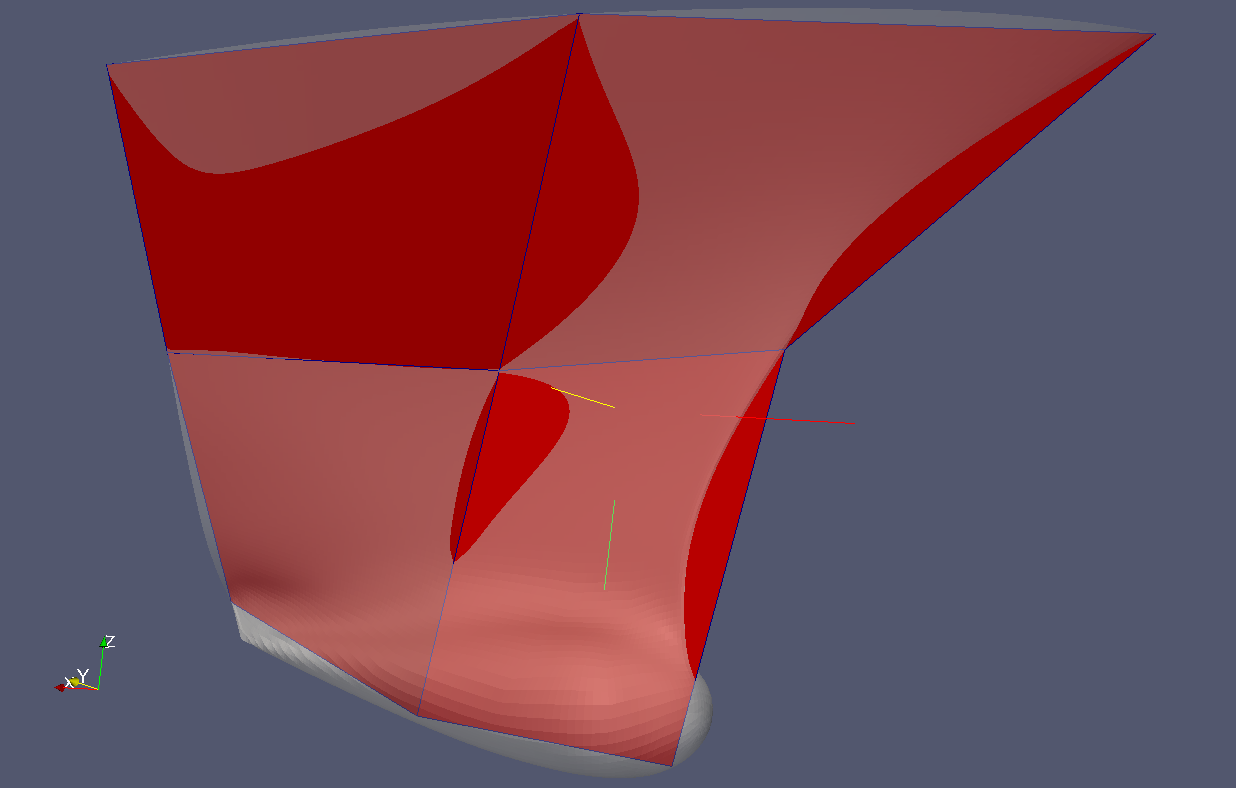
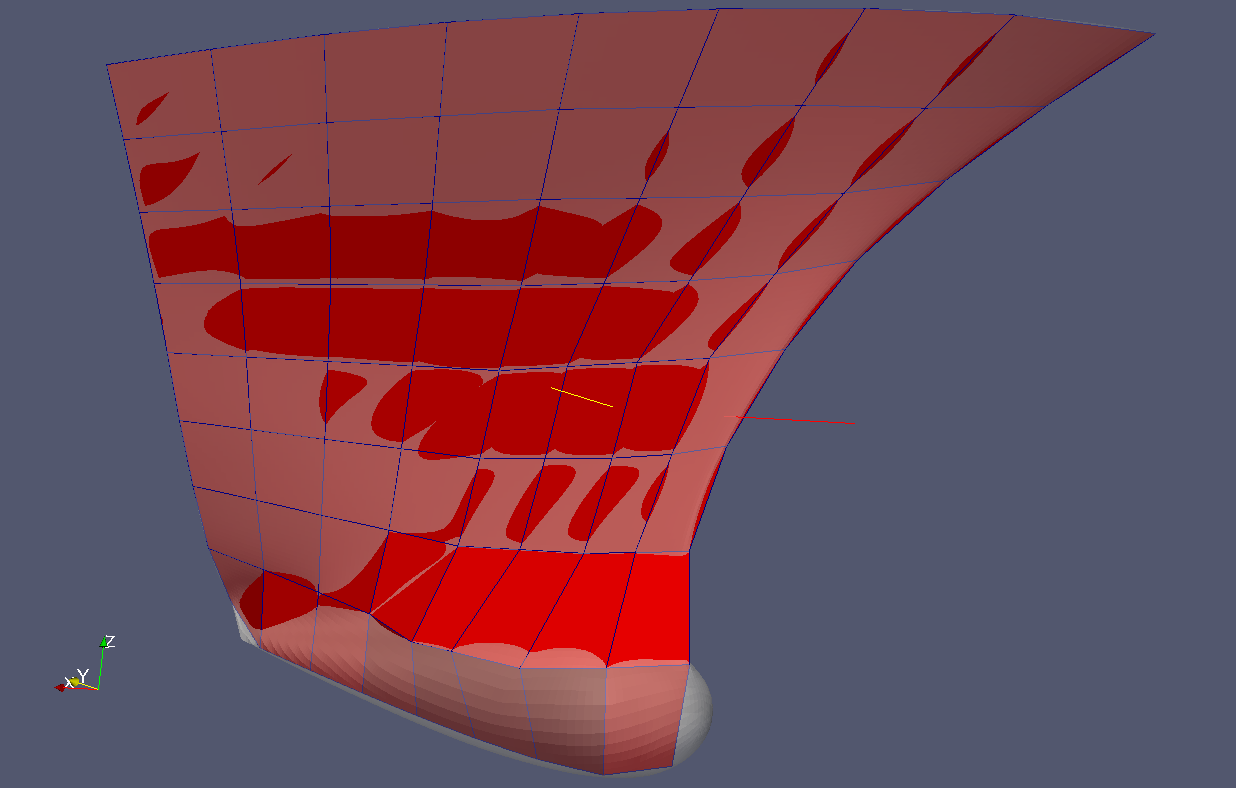
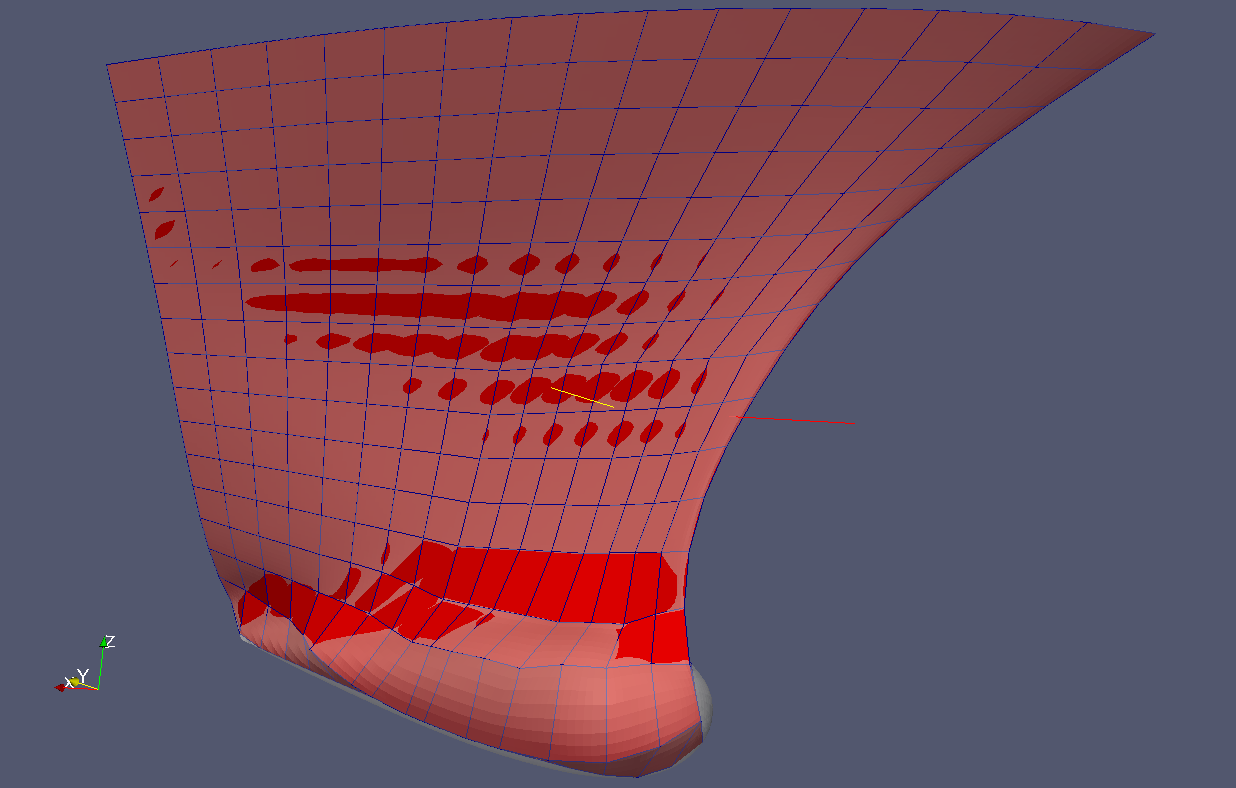
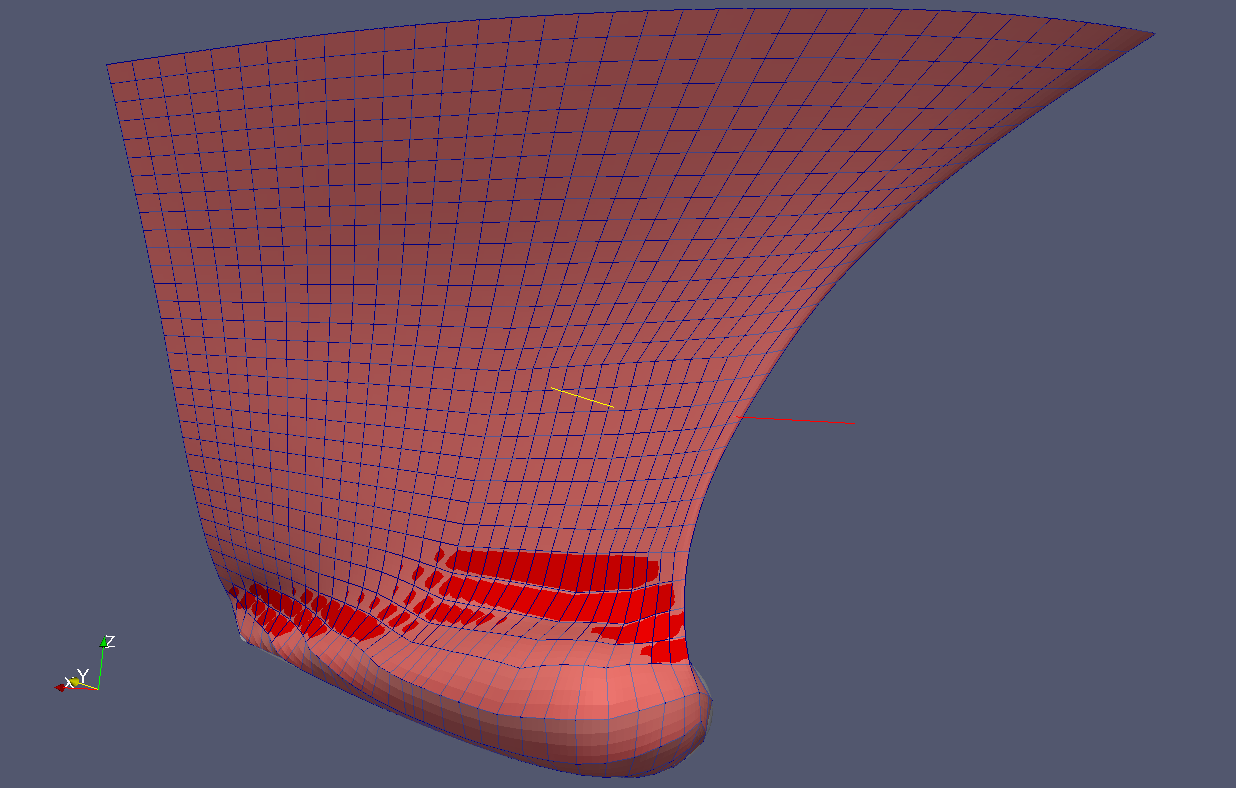
The final test shows results using instead the projection normal to the faces:
 |  |  |
 |  |  |
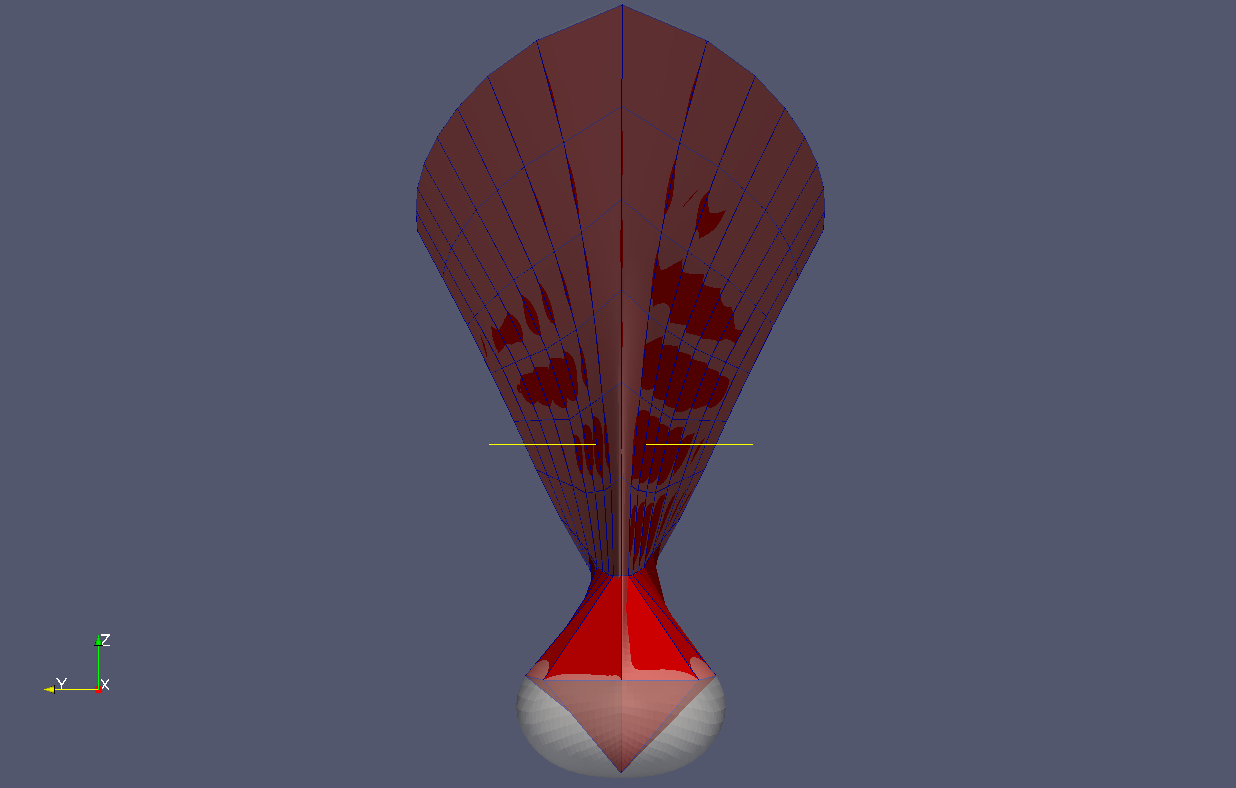 | 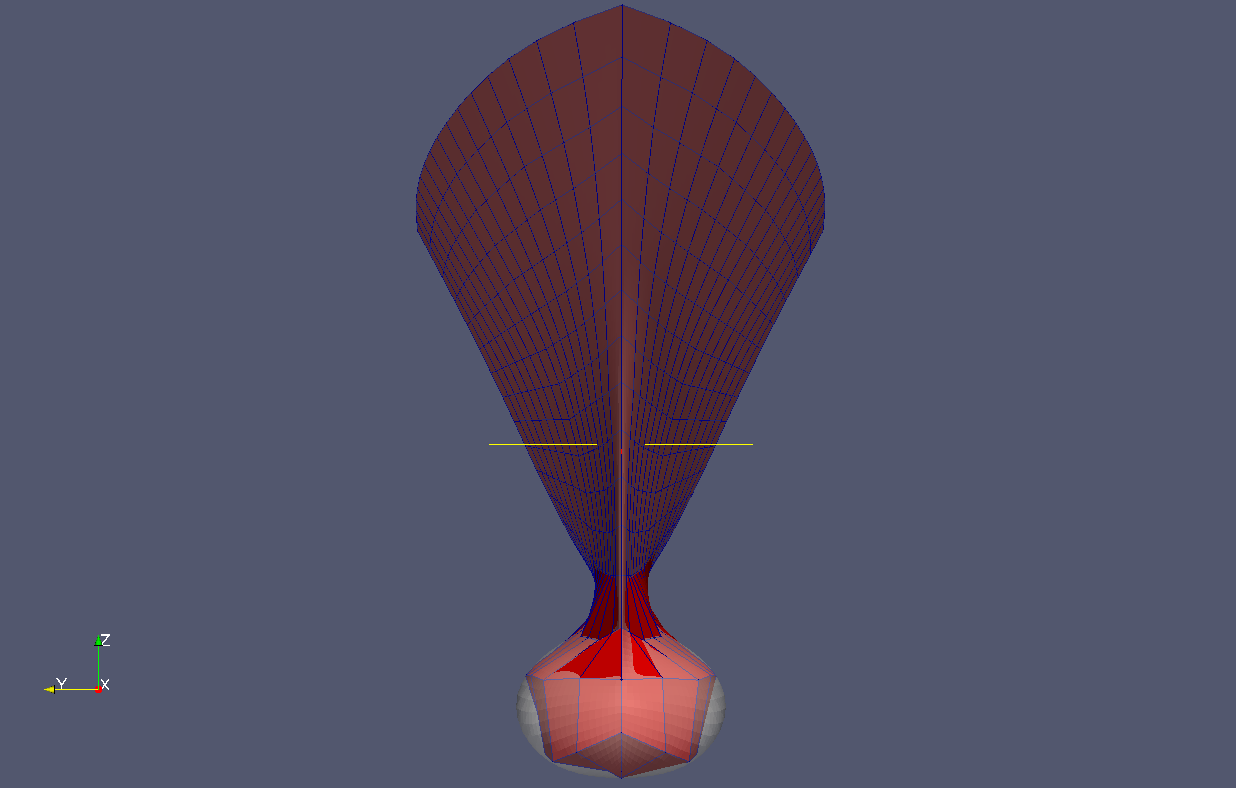 | 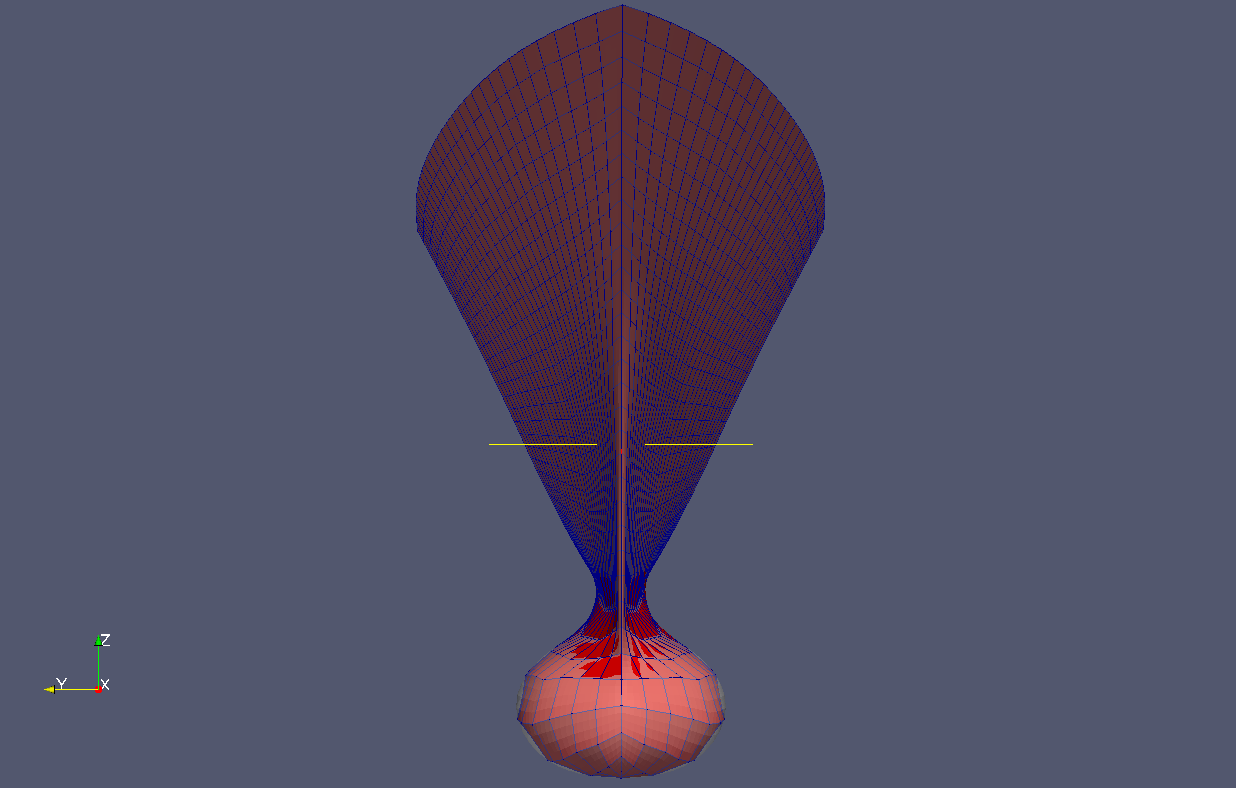 |
The pictures confirm that the normal to mesh projection approach leads to grids that remain evenly spaced throughtout the refinement steps. At the same time, these meshes represent rather well the original geometry even in the bottom region of the bulb, which is not well recovered employing the directional projector or the normal projector.
 1.8.17